Tips on filling your landscape wish list while saving big bucks!

Curt Havens
So you have decided to do a landscape make over, but unfortunately, your grandiose vision and your budget aren’t in the same solar system…welcome to the club! There is good news, so follow me here. You can fill a good portion of your wish list cheaper than you think by making a couple of key choices and doing the following:
First, get on the same page with your wife or significant other as to exactly what the both of you want. Create a vision with your partner that you can confidently share with your designer/contractor without disagreeing in front of them. Second, take measurements of the space you are adding to or remodeling. Lay it out on graph paper and work in a comfortable scale. Usually 1/8 scale is preferable and simply means each inch on a ruler represents eight feet. Once you are finished, you will have a mathematically accurate drawing… or what a painter would call….a blank canvas. In landscape contracting, there are multiple forms of measurement to calculate a jobs cost. Lineal foot, square foot, unit (per tree/per plant, etc.), ton, yard…many as you can see. Third, if you are doing both hardscape and landscape, layout your hardscape first, then you can work your softscape in gently, but effectively, around all these new things later. Fourth, after you have an idea of what hardscapes you want and where you want to see it in the yard, look up plants on the internet. WWW.DESERT-TROPICALS.COM is a decent site to see and learn about plants if you are willing to invest a little time. Another great idea is to take your digital camera, drive around, and take pictures of what you like. You could go as far as drawing symbols on your plan where you would like to see certain plants. Designing is a lot of fun…try it sometime!
Now that you have several important steps out of the way, the next is to decide how much you want to invest in the project. Set a budget, but also decide the absolute maximum you are willing to invest. I find people have a tendency to underestimate how much things cost. You are now ready to find a contractor and set an appointment. You have no idea how much money you have just saved to this point…more in a minute. When your landscape contractor arrives, you are now perfectly prepared to show them your vision of things. If you are open to ideas, he/she can “piggy back” some of your thoughts, which eventually turn into one exciting vision. A good designer often makes your vision even better! The good part…because material costs can vary drastically, have your contractor recommend a variety of material options so you can compare costs from one to another. This can save thousands in certain cases. Have the contractor price out the job one way, then another if necessary, using a different materials list to see where you might save. Sometimes, this alone makes all the difference. Another thing…you are more likely to get discounts and lots of “favors” during the course of construction because the contractor you hired had less time vested in your project from start to finish…all because of your preparation. Save even more by not doing the following: don’t come across as high maintenance, or constantly change your mind during the course of construction. Nothing hurts a project more than constant addendums. That only increases frustrations and costs simultaneously. By following these simple steps, you are more likely to fill most of your wish list than not. Feel free to e-mail me with questions rchavens@cox.net Good Luck!
Indoors Out….Unique ways to add outdoor living space

Curt Havens
When Lanny & Carol Lang bought their Lakewood home in Ahwatukee back in 1986, they were among the first of many families to settle in the area. As original owners, they have seen a lot of changes. Their children have now moved onto college and beyond. Being empty nesters, they desired to make some modifications at home to compliment their new found lifestyle. Both being the outdoor type and very active, what a better way to start than by creating a functional, great new look with unused space, and at the same time giving their Lakewood home brand new curb appeal.
Based on the sun exposure, the front of the home was the perfect place to add a relaxing new courtyard. It is just perfect for that morning cup of coffee with the newspaper or an early evening cocktail at the end of a long day. When the Lang’s first contacted me, they had a few ideas of their own, and were also open to suggestions. After listening to their “wish list” and discussing possibilities, we came up with a game plan to fit their new needs within their budget. Here’s what we did and how we did it…
The Lang’s wanted a small courtyard out front to relax and enjoy the neighborhood. They asked for a small decorative wall to define the space. They wanted to add a custom gate between two masonry pillars which matched the new custom iron door in the front of the home they had just installed. To provide needed shade, they added a wood arbor to span the distance between the garage wall on the left and the home on the right. This arbor also increased the level of intimacy and overall feel. They wanted additional seating to compliment furniture, along with pots for plants. Both wanted a water feature, but were unsure of which direction to go. We gave them a few options that fit their budget. When it came to the floor of the patio, (we call it flatwork in landscape), there were several options and I recommended pavers. With new planting pockets and a low voltage lighting package, we had everything we needed to begin the design.
The first thing we did was define the space. In other words, how much workable space will we have for our courtyard? Doing a rough sketch and taking measurements gave us the framework we needed to get started. To get a better handle and visual of the overall design, we took this outline with all the measurements and put them in scale. Typically most designs are done in 1/8 scale, but since our space was fairly small, we decided to go 1/4 scale on this project. Once the design was completed we sat down for a plan review, made a few small changes and we were on to the next step. Selecting plant material, paver style and color, light fixtures, caps for the courtyard wall, etc…were all on the list. Once we had a decision on all materials, the design was off to the HOA for approval before we could start the build. Fortunately, the plan was approved easily and then scheduled for construction.
We started with demo of their existing concrete walkway which connected the driveway to the front door. Basically the “A” typical concrete walk was completely removed up to the front door. The courtyard walls were laid out with landscape marking paint as well as the position of the two pillars which grace the entrance. Hardscape is the first place to start after demo and prep. The courtyard wall footings were excavated and poured followed by block construction of the actual walls. Before we can finish the walls at the desired final height, we had to know the finished height of the pavers we chose for our flatwork. Once we knew this information, it was easy to finish the courtyard walls with a nice flagstone cap. We used a decorative flagstone turndown under the cap and finished off the walls with a stucco pattern that matched the house.
The water feature was simple, and beautifully effective. Monolithic boulders were core drilled from top to bottom to allow water to flow individually off each boulder. A small pond was excavated, electric brought to the location to support our pumps, a water line installed for the auto fill, and after a little “tinkering”, it was up and running in a few days.
The layout and installation of the pavers was next. We chose a three piece random pattern using a tumbled AZ Block product we found locally. Since the homeowner wanted plants, pots, and lights throughout the courtyard, we needed to make sure we added adequate sleeving under the pavers to run irrigation and wiring easily from point A to point B. We also needed to make sure the pavers were pitched properly so that water would always run away from the house. Pavers are one of the best choices for flatwork here in Arizona. They are very pleasing to the eye, durable, and from a price per square foot…there just isn’t a better product for the money.
Once all the hardscape was completed, we placed the plants and lights, added some decorative rock to fill the planters, painted the courtyard walls to match the house, cleaned up and we were done. The Lang’s took it upon themselves to add some furniture they had admired, and within a week or two after we were complete, the furniture was delivered. Each piece was specifically chosen to fit in a certain area of the courtyard. Now they have an additional 500 sq ft of living space, enhanced the curb appeal of their home and will have a great place to relax over the holidays. I want to thank them for their business and being the perfect client. It was a pleasure working with them.
Now is a great time for doing a remodel on your existing landscape or adding some needed living space to the front or backyard. Great deals and discounts can be found everywhere. If you’ve had the thought of making a few changes, you couldn’t be choosing a better time. Big Bargains…Big Results!
Bathroom Plumbing Fixtures
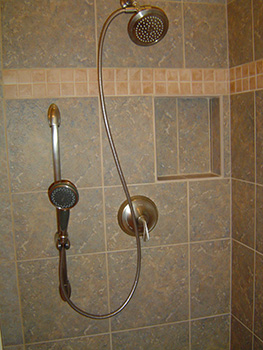 Bathroom plumbing fixtures have come along way since I was a kid back in NY. Yet when all is said and done there are many similarities that exist today. All trends seem to come full circle from back in the day to present day. We transitioned through the seventies into more sleeker modern looking fixtures and yet today we seem to have incorporated the older styles with the sleekness of such fine styles with rain heads and body sprays. Let us not forget the mystique of glass block incorporated in the more elaborate walk in showers. There will always be style changes in plumbing fixtures but remember if proper planning is not done in the construction stages even the best most expensive fixtures will fail. Shower accessories are trending as well, even those $300.00 soap dishs!
Outrageous Olive Oils
More about Outrageous Olive Oils here.
Mediterranean Style
Modern design is becoming more popular in our home décor today. Achieving that look in our existing Southwest architecture is not always easy to do. However, Spanish Modern, often referred to as Mediterranean, is an ideal design style for our Southwest homes. These two styles work beautifully together. Mediterranean construction materials have been Southwest basics for years…stucco, stone, terra cotta roofing tiles. If you’re looking for an easy way to transition your home into a sanctuary of modern flair, Mediterranean design may be perfect for you. It’s a refreshing, unpretentious style that is warm and friendly, comfortable and inviting. This look can take on a contemporary feel with its bold simplicity and uncluttered lifestyle. Here are a few simple guidelines to achieve this “distressed meets polished” look.
Think Texture…Color…Theme.
Combine soft colors with vibrant accent colors.
Introduce rich textures and patterns through artwork, wall hangings, runners.
When creating a Modern Spanish theme acquire artwork with subjects of wine and vineyards, European landscapes, architectural themes or rugged coastlines. Keep in mind art becomes more distinct with size and contrast of light and dark.
Incorporate interesting iron and distinctive lighting.
Choose hard flooring over carpet.
Furniture should be simple and uncluttered.
Whether your Mediterranean style is Spanish, Mexican or Italian, a modern feel is easy to achieve. Simply functional or extremely formal, creating an artistic modern living space using innovative Mediterranean elements will help make your design transition manageable and enjoyable.
Denise
Copyright 2010 Teichert Design Group
2011 Design Trends
Although we are seeing more contemporary and modern style renovations, warming up the house remains to be a strong request and 2011 trends are bringing us an “earthiness meets modern” feel. Not Rustic…more Mediterranean or better described as Spanish Modern. The trend is towards warm colors with a broken in feel yet clean, organized and streamlined. “Distressed meets Polished”
More people are entertaining at home these days. Creating our outdoor spaces into living spaces is becoming quite popular. And opening up our indoor rooms to allow more flexibility and to modernize our home is a remodel trend we’ll be seeing a lot of.
Entertaining more at home isn’t the only thing we’re doing. We are also WORKING more from our homes. Multi-functional living spaces are being created with an emphasis on industrial flair. Designing with clean lines and introducing the trend of geometrics is a way to help achieve this look.
Many of us have experienced a great deal of stress over the past couple of years. A welcome design trend for 2011 is to turn our bathrooms Zen-like. Think in-home Spa…relaxing, soothing, a place to escape. Bathroom remodels are on the rise. The economy plays into this as bathrooms are less expensive to remodel yet are a space we occupy daily and should feel de-stressed in.
A rundown of Design Trends wouldn’t be complete without mentioning color. Tribal feels and earthy tones will remain strong, however Pantone has introduced Honeysuckle as it’s #1 pick for 2011. A vibrant, energetic pink that’s far from calm. It is interesting and inviting however, and screams “fresh start”.
Denise
Copyright 2010 Teichert Design Group
Basic Vinaigrette
 |
Chef Jon-Paul Hutchins Le Cordon Bleu | Executive Chef |
Ingredients:
3 ounces red wine vinegar

1 clove of garlic minced
1 tablespoon of basil, oregano, dill or savory
12 ounces olive oil
salt and pepper
Directions:
1. Combine vinegar, garlic and herbs in a mixing bowl or blender.
2. Slowly pour in the olive oil while whisking or blending.
3. Season with salt and pepper
For more culinary inspiration KEYWORD "recipes", a specific ingredient or click here.
Downsview Kitchens
We offer our clients full customization with the widest range of styles and finishes from any manufacturer. We offer hundreds of possible color and finish combinations, which can be used to create truly unique designs. An extensive range of pine, maple, alder, mahogany, cherry, oak, euro veneers, polyesters, lacquers and laminates are available for the customer to select and develop the most functional and stylish design possible. We furnish our cabinetry with the highest quality finishes, dovetail drawers, drawer glide systems, hardware, hinges, and accessories available anywhere.
Our Home on Episode 10
Starion Custom Residences
Downsview Kitchens
Starion Custom Residences and Downsview Kitchens complete an AMAZING home transformation in just 60 days! As seen in Episode 10.
Title
Downsview Kitchens
Description
Our homeowners share there experience working with Starion Custom Residences, Downsview Kitchens and FW&D! As Seen in Episode 10.
Visit our website for more information or see our work for yourself in Episode 10.
Basic Chicken Stock
 |
Chef Jon-Paul Hutchins Le Cordon Bleu | Executive Chef |
Yield: 1 gallon
Ingredients:
5 pounds chicken bones

6 quarts of water
1 pound mire poix (1/2 pound onions peeled and cut 1 inch, ¼ pound carrots peeled and cut 1 inch, ¼ pound celery cut 1 inch)
1 sachet de spice (6 whole pepper corns, 6 parsley stems, 1 sprig fresh thyme, 1 bay leaf secured in a cheese cloth bag)
Directions:
Place the bones in a large stock pot and cover with the water. Bring to a boil and reduce to a simmer. Skim any “scum” that floats to the surface.
After 4 hours of gentle simmering and skimming, add the remaining ingredients and simmer for one more hour.
Strain through a fine mesh strainer into a container and cool in an ice bath (a sink filled with ice and water) until cool to the touch (70 degrees).
Cover and refrigerate or divide into smaller containers and freeze.
For more culinary inspiration KEYWORD "recipes", a specific ingredient or click here.
My New Favorite Grilled Shrimp Recipe
 |
Chef Jon-Paul Hutchins Le Cordon Bleu | Executive Chef |
Serves 4
Ingredients:
2 LB U-12 Shrimp in the shell butterflied.

For Marinade:
Juice of 1 lemon plus zest
½ cup olive oil
1 tablespoon dried oregano
2-4 teaspoons red pepper flake
½ cup fresh basil
salt to taste
Directions:
In a blender combine all of the ingredients for the marinade.
Pour over the shrimp make sure to rub the marinade into the butterfllied areas. Marinate for 30 minutes to 1 hour.
Grill and enjoy.
Pairs Well With:
 |
 |
| Chardonnay | Riesling |
For more culinary inspiration KEYWORD "recipes", a specific ingredient or click here.


